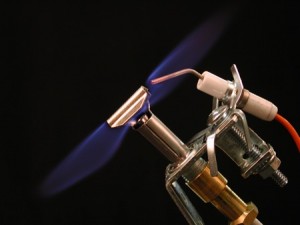
Electronic Ignition Systems (EIS), also know as Intermittent Pilot Ignition Systems (IPI), are becoming ever more popular, for a variety of reasons. In some cases, it is because of mandates to not install standing pilot systems (usually in new construction installations). In others, consumers feel they are saving resources (both gas and money) by not having a constantly burning pilot (the payback from gas savings versus the cost of the EIS could be as much as twenty years). Another reason is characterized as that of safety, although it is really borne from the consumer’s inherent fear of gas, so they wish to have no open flames at all, no matter how small, when an appliance is unattended.
But regardless of the reason, the function of EIS/IPI systems is the same, and the service issues from which we receive calls mostly fall into two categories:
- Ground not established; and
- Sensor is not engulfed by pilot flame during operation.
1) Ground. The EIS system should be viewed as a circuit through which electricity flows. Starting at the control module, this is the path:
Control Module → Orange Electrode Wire → Electrode → Pilot Flame (yes, electricity flows through fire) → Pilot Hood → Pilot Bracket → Gas Log Burner → ** Ground ** → Control Valve → Wiring Harness → back to Control Module.
I’ll address the Pilot Flame in the next section. Establishing Ground can be as easy as scratching off some paint on the burner so that you have metal-to-metal contact between the pilot bracket and the gas log burner. It may be that you need to run a grounding wire from the pilot bracket to a source of ground, such as a gas line, or back to the control valve. Sometimes it’s a matter of trial and error. But regardless of how you achieve it, you must have good ground to complete the circuit.
2) Sensor Must be in the Pilot Flame. The EIS/IPI systems are what I term “Pilot on Demand” systems. When you flip the switch, it starts a lighting sequence, with continuous sparking that lights the pilot gas. The resulting flame must engulf the sensor electrode so that:
i. It competes the circuit (see above); and
ii. It “justifies” the pilot flame to the control module. When the pilot flame fully engulfs the electrode, it is essentially telling the control module that “Hey, we’ve got a flame that can light the main burner, so it’s okay to open the valve and let the gas flow to the main burner.”
If the pilot flame does not fully engulf the electrode, the control module will just keep on sparking, until it gets tired or finds the flame.
If the EIS successfully completes the lighting sequence and lets gas flow to the main burner, but then later the main flame goes
out, it is because the pilot flame pulled away from the electrode. Causes of this could be:
- Electrode just barely in adjustment at the edge of the pilot flame.
- The pilot flame is influencing the pilot flame, pulling it away from the electrode.
- Natural draw of the fireplace is pulling the pilot flame off of the electrode.
- Wind has blown the pilot flame away from the electrode.
In the first case, the electrode needs to be adjusted so that it is fully engulfed in the pilot flame from the start. In the other cases, you may need to reposition the pilot and/or provide external shielding to remove flame or wind influence. In any case, the pilot must always fully engulf the electrode in order to provide smooth, continuous operation.
If the main burner flame cycles on and off repeatedly, it is due to the flame touching, then pulling away from the electrode.
Touch, then pull away; touch, then pull away. Correcting this situation is identical to the above paragraph. You must counteract the influences on the pilot flame so that it stays rock steady on the electrode.
The above situations reflect almost 99% of all service calls for EIS/IPI systems. Knowing what causes them is half the battle. Establishing Ground, setting up the electrode in the correct position during the installation and making the proper adjustments and/or shielding makes up the last half. And when one “fix” doesn’t correct the problem, try another, because “it ain’t over ’til it’s over.”

